

A giraffe crochet costume for your kids, being them girls or boys. Both will simply love it!
Supplies
Yarn weight: Worsted / 10 ply (9 wpi), brown and yellow
Hook size: 5.0 mm (G)
wool needle
elastic string
fabric colors
sponge
Abbreviations:
ch – chain
sl st- slip stitch
SC – Single Crochet
DC – double crochet
HDC – half double crochet
FPS – front post stitch
inc – increase (2 stitches in next one)
dec – decrease (work next 2 stitches together)
Crochet beanie
Check the Giraffe crochet beanie article to get the pattern.
Sweater

Border
(make 2)
The rows number may differ depending on yarn and tension. Write down your child’s belt size and divide it in half. Work a chain just a bit shorter than your measure and continue working as written in pattern.
Row 1: using brown yarn, 7 ch, insert hook in second ch from hook, 6 HDC, turn
From now on, always work in back loops until the end of border.
Rows 2-33: 1 ch, 6 HDC in back loops, turn.
sl st and cut the yarn.
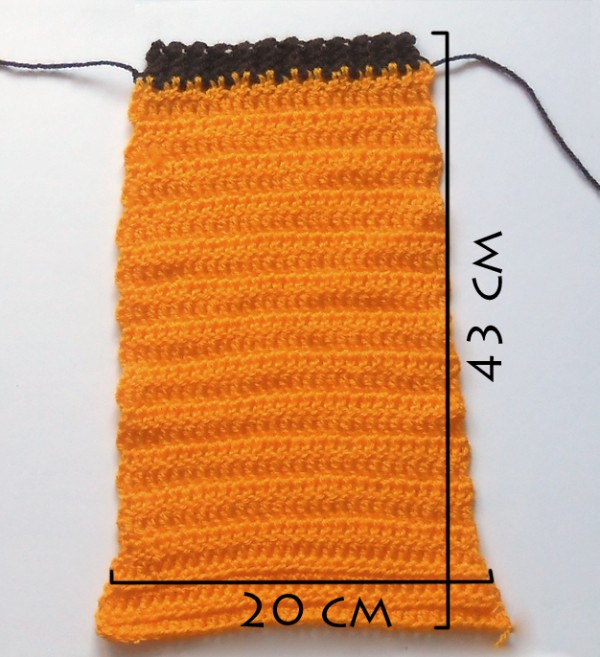
Front side
Row 1: with yellow yarn, ch 1 in first border stitch, 2 HDC in same stitch, 1 HDC around, 2 HDC in last stitch, turn (35)
Rows 2-33: 1 ch, HDC around, turn (35)
Row 34: 1 ch, sl st in next 4, 27 HDC, turn
Rows 35-41: 1 ch, HDC around, turn (27)
Row 42: 1 ch, 6 HDC, DEC, turn (7)
Row 43: 1 ch, 7 HDC, turn (7)
Row 44: 1 ch, 5 HDC, DEC, turn (6)
Row 45: 1 ch, 6 HDC, turn (6)
Row 46: 1 ch, 4 HDC, DEC, turn (4)
Rows 47-49: 1 ch, 5 HDC, turn (27)
sl st and cut the yarn.
turn the work and start again on the opposite side, working from Row 42 to Row 49.
Back side
Row 1: with yellow yarn, ch 1 in first border stitch, 2 HDC in same stitch, 1 HDC around, 2 HDC in last stitch, turn (35)
Rows 2-33: 1 ch, HDC around, turn (35)
Row 34: 1 ch, sl st in next 4, 27 HDC, turn
Rows 35-45: 1 ch, HDC around, turn (27)
Row 46: 1 ch, 4 HDC, DEC, turn (4)
Rows 47-49: 1 ch, 5 HDC, turn (27)
sl st cut the yarn.
turn the work and start again on the opposite side, working from Row 46 to Row 49.
Sleeves
Border
(make 2)
The rows number may differ depending on yarn and tension. Write down your child’s arm size and work a chain just a bit shorter than your measure and continue working as written in pattern.
Row 1: with brown yarn, 7 ch, start working from second ch from hook, 6 HDC, turn
From now on, always work in back loops until the end of border.
Rows 2-28: 1 ch, 6 HDC in back loops, turn.
sl st and cut the yarn.
Arm
Row 1: with yellow yarn, ch 1 in first border stitch, 2 DC in same stitch, 1 DC around, 2 DC in last stitch, turn (30)
Row 2: 2 ch, 30 DC, turn (30)
Row 3: 2 ch, INC, 28 DC, INC, turn (32)
Row 4: 2 ch, 32 DC, turn (32)
Row 5: 2 ch, INC, 30 DC, INC, turn (34)
Rows 6-24: 2 ch, 34 DC, turn (34)
Row 25: ch 1 in first border stitch, 2 HDC in same stitch, 1 HDC around, 2 HDC in last stitch, turn (36)
Row 26: 1 ch, INC, 1 HDC around, INC, turn (36)
sl st and cut the yarn.
Collar
Row 1: with brown yarn, 7 ch, insert hook in second ch from hook, 6 HDC, turn
From now on, always work in back loops until the end of border.
Rows 2-50: 1 ch, 6 HDC in back loops, turn.
sl st and cut the yarn.
Pants
Belt
Chain as many chains you need to fit around the belt. Continue working as shown in pattern
Working on belt we’ll be using the Front Post Stitch (FPS). Watch the video to see how to make it.
Row 1: 70 ch, don’t turn the chain, sl st in first ch
Row 2: 2 ch, 70 DC, sl st on top of first DC
Row 3: 2 ch, (1 DC, 1 FPS) around, DON’T sl st, turn
Row 4: 2 ch, 70 DC, sl st on top of first DC
Row 5: 2 ch, (1 DC, 1 FPS) around, sl st on top of first DC
At this point you’ll get a ring with a hole in the middle. Insert che stretch string as shown in the picture above and sew the sides. At the end, sew the string in place and close the hole.
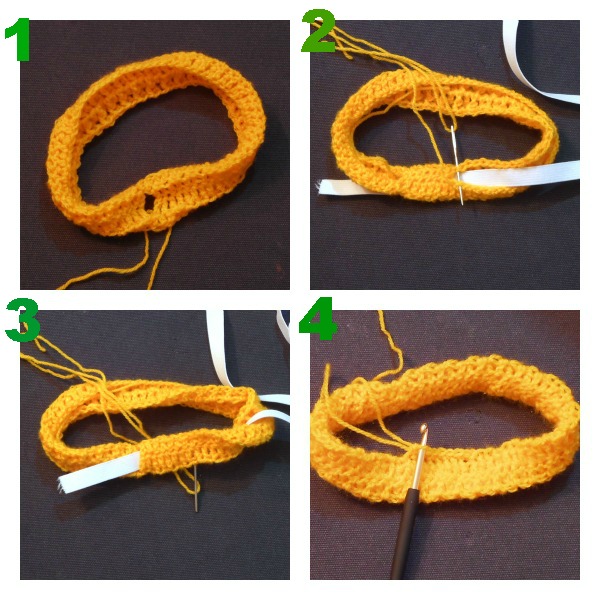
Row 6: insert hook in a stitch (image 4) and work 70 SC, sl st on top of first SC
Rows 7-19: 2 ch, 70 DC, sl st on top of first DC
Legs
Row 20: 2 ch, 35 DC, leave last DC unworked and sl st on first DC on same row
Rows 21-45: 2 ch, 35 DC, sl st on top of first DC
cut the yarn.
Row 46: using brown yarn, ch 1 on last DC, 35 SC, sl st on top of first SC.
cut the yarn.
Brown dots
Protect your table with a plastic cloth and shape your sponge with a knife or the scissors.
Drop a bit of cloth color in a plastic dish and mix it with a bit of water. Put the sponge in the color and push it around the costume to shape as many dots as you like.